So, you ordered a trampoline for your backyard a while ago, and it’s finally here. How exciting, right?
But as you start unpacking it, you’re hit with a sudden realization:
I’m supposed to be the one assembling this thing!
And that’s where, for most people, the excitement starts to fade, slowly turning into confusion, and sometimes, even full-blown panic:
Where do I even begin? How long will it take? Can I do it by myself, or will I need help?
I know that you have all these questions about how to set up a trampoline racing through your mind, but I promise that it doesn’t have to be as confusing and frustrating as it seems at first glance.
Plus, you have me in your corner – and I promise to guide you every step of the way.
Are you ready to get started?
Let’s get straight to it, then!
More...
Trampolines 101: Reading The Manual & Getting Things Ready
Okay, I know that this one seems obvious enough. But you’d be surprised how many people opt for skipping the instructions manual provided by the manufacturer, and turning straight to the Internet for directions on how to set up a trampoline.
I can’t stress this enough:
Please, before you go any further in your trampoline assembly efforts, take a moment to go over the user manual that came with your trampoline.
Even if it doesn’t end up contributing much to the bigger picture – because we all know how confusing some manuals can be – you should still take a moment to sit down and read it.
If anything, it will help you make sure that all the parts are there, and that you have the tools needed to get things done.
What’s In The Box?
Besides going over the manual, I always recommend that you check the packaging, too.
Some trampolines – especially larger models – can be shipped in two or three separate boxes, so you can imagine the confusion of trying to figure out what goes where in the middle of the assembly process.
This way, you’ll ensure two things:
First, all parts listed in the manual are there. You can’t set up a trampoline properly if you have pieces missing from the box. And it’s much better to check now, than when you’re about to finish the assembly, right?
And second, you’ll get familiar – and more comfortable – with all the parts and pieces that will make up your new trampoline.
You’ll probably get a checklist included with the instructions, but it all depends on the manufacturer. If not, feel free to refer to the one provided below:
Also, I know that this is common sense, too, but I’m going to mention it for good measure, anyway:
If you find that certain parts are missing, don’t try and do it the DIY way. Contact the manufacturer and see what they can do about it.
You’ll either get a replacement part shipped separately, or an entirely new trampoline, depending on the company’s policy.
My point is:
As much of a handyman as you are, trying to replace missing parts with something else or adapt the design in any way could spell disaster. You’re messing with the trampoline’s safety here – and that’s never a good idea.
Tools Need For Trampoline Assembly
The good news here is that you’ll probably get a few of the essential assembly tools included in the package. It all depends on the manufacturer, of course, but the chances are that you’ll find a screwdriver and a spring pull in one of the boxes.
The bad news, however, is that you’ll probably need a few more things to get started.
So, to help you avoid being taken by surprise, I’m going to list all the tools you’ll need during the assembly process, from start to finish:
Okay, it’s time to gather all your tools – go ahead, I’ll wait for you here – and get down to business!
How To Choose The Right Sized Trampoline?
There are different sizes of trampoline available in the market and they vary in weight ages and family size.
Before you buy a trampoline, it is important to select the right type to make sure you and your family will have great fun and enjoyment when using the trampoline.
The question now is, how do you select the right size of trampoline?
If you are buying the trampoline for only your use, it may be easier to make the right choice. But if you are buying it for the entire family use, there are certain things to consider.
However, whether you are buying for your personal use of for the family, it may not be easy to select the most ideal one if you don’t have an idea of the different sizes of trampolines and which ones are better suited for your needs.
The Different Sizes of Trampoline
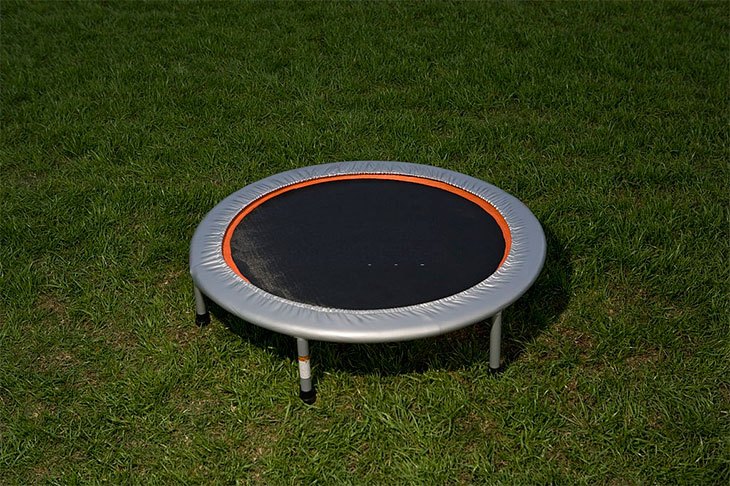
Trampolines can come in oval, rectangular or round shapes. They are also in large medium and small sizes.
1. Round Trampolines
Round Trampolines (8 ft and 8ft & 10ft)
The 10 ft and 8 ft trampolines are specifically for those who want to buy a trampoline for their kids and don’t have very large space to afford a bigger one.
This smaller size trampoline is just ideal for small courtyard/backyard or for families with smaller children.
But one safety rule to follow with this type of trampoline is to only have a child on it at a time. Since it is small, two or more children can easily bump into each other, causing them to hurt each other.
This size trampoline is equally lower to the floor, which is ideal if you have smaller children. The 10 ft trampolines are also great and can last longer.
12ft Trampolines
These are ideal for families with two children who want to play together on the same trampoline. They are not large enough but can rightly accommodate 2 kids or a young adult without much stress.
You can have only one older kid or two small kids at a time on this trampoline.
14 and 15ft Trampolines
These are the largest and are perfect for adults, entertainers and professionals. If you have enough space in your yard and enough money, this is the type of trampoline you should be considering.
They are more comfortable and provide bigger and better bounce than their smaller counterparts. This trampoline can accommodate all your kids (provided they are not more than 10) and still stay strong as they bound on it.
It is also ideal for adults who would love to have fun and practice all types of trampoline tricks. If you have sociable kids, they can invite their friends also to join them as they have fun together.
Interestingly, they are also very durable and are made with high quality springs that can stand the test of time.
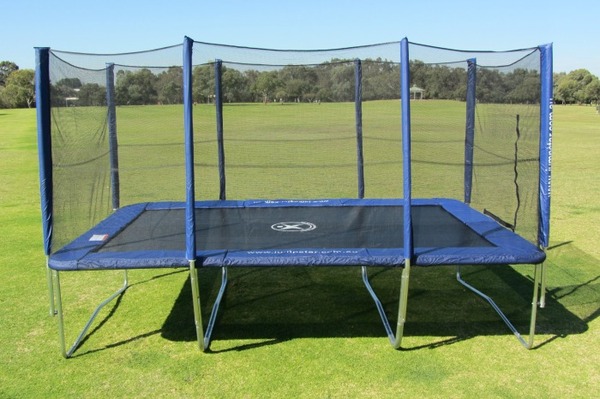
2. Rectangle Trampolines
There are different sizes of rectangular trampolines to choose from when considering buying the most ideal one for your family’s needs.
7 x 10ft Trampolines
These are very portable and can be placed at garden shed, or in between the swing and chubby. It is small and does not require much space to place it.
This is the type you should consider if you are financially limited or don’t have enough space to keep a bigger trampoline.
8 x 12ft Rectangle Trampolines
These ones have one of the best bounces. They are perfect for kids between 10 and 14 years old. You can buy this model if they are into gymnastics and want to improve their skills.
The 12 ft rectangular trampolines provide better bounce than their circular counterpart of the same size because one side of the trampoline is shorter in length. It is ideal for one adult or two kids at a time.
9 x 14ft Rectangle Trampolines
This is the larger version meant for those who are training to be professional gymnasts. They provide better bounce and can help anyone perfect their trampoline skills in little time.
They can accommodate two people at a time without creating any laxity on the springs.
10 x 17ft Rectangle Trampolines
This is for professional gymnasts and those who intend to practice trampoline skills for competition. They are made from strong springs.
You should consider this type of trampoline if you have older kids or someone practicing trampoline for competition. They are taller and more suitable for single flip and tumble mat routines.
The above are the different types and sizes of trampolines available in the market today. If you are buying for your kids, you can ask them what shape of trampoline they prefer. But if you want to keep this as a surprise package for them, it can be easy to find out what they want.
A general observation in the trampoline industry over the years have shown that boys usually prefer round trampolines while girls are more likely to pick the rectangular shaped ones.
Girls are generally lighter than boys. Also, while girls prefer to stick to normal dance and gymnastic routines when playing on the trampoline, boys have an all round playing style where anything goes for them.
This means that if you are buying the kid trampoline for a girl, you need to consider a rectangular trampoline which is easier for them to generate better and higher bounce. But if you are buying for a boy, a round trampoline will be more ideal.
How To Set Up A Trampoline: Step-By-Step Instructions & Tips
Assuming that you’ve finished prepping, and have all the pieces – and all the tools – needed for the job, it’s time for the real work to start.
I know that it seems like mission impossible, especially when you’re standing there, looking at a pile of parts and pieces, with absolutely no clue as to what goes where or why.
But with proper guidance – and a little help from a friend – pretty much anyone can set up a trampoline, no matter how inexperienced they are.
More often than not, it’s about following instructions carefully, doing one thing at a time, and double-checking everything – there’s not much else to it.
Step #1: Lay Out The Frame & Assemble It
A trampoline is, by no means, a small structure – and that means that planning your available backyard space is essential.
Can you see where I’m going with this?
By laying all the metal ring pieces out on the ground, you’ll get a pretty good idea of how big your trampoline is. I recommend that you do this right on the spot where you’d like to put it up so that you’ll know if you have enough space for it there, or not.
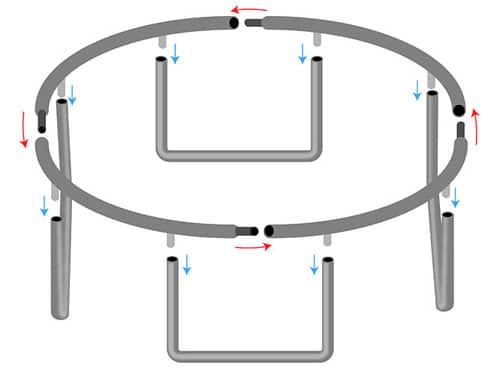
Once you’ve made sure that there’s enough room for it, and that you’ve arranged the pieces end-to-end properly, you can proceed to connect them:
You’ll find the specifics in your instruction manual, but the general idea here is to connect them by pushing them together and snapping them into place one by one.
Step #2: Attach The Legs
So, you have your ring together – what’s next?
It’s time to move on to the second portion of your frame assembly – assembling the legs and attaching them to the metal ring. This part’s relatively straightforward because trampoline legs are nothing more than a couple of metal poles that snap together much as the ring does.
You’ll probably have to do this part upside down, though, because it’s easier to attach the legs when the connection points on the ring are facing upward.
While it may seem simple, be sure not to rush these first two steps.
You’re laying out the foundations for your trampoline here, so there’s no room for mistakes – it should be well-put-together and sturdy.
On that note, while you might have your frame together at this point, remember that it’s not safe yet:
You still have to secure them with the included screws – that’s what the small holes along the frame are for, of course.
If you’d like to speed things up, now’s the time to pull out the big guns, and put your power drill to good use.
Step #3: Connect The Mat And Springs
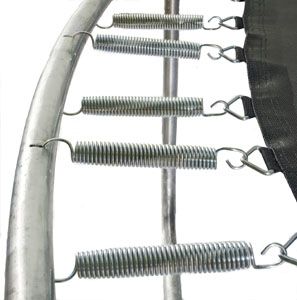
Once you have your frame in place, you can unroll the actual jumping mat – and that’s where the tricky part starts. Someone’s gotta do it, though, so, pick a spot, and connect your first spring:
Hook one end to the loop on the mat, and the other to the hole in the frame.
That wasn’t so bad, now, was it?
Well, the first couple of springs never are – but the more springs you connect, the tighter the surface of the jumping mat becomes. By the time you have only a few springs left, it becomes nearly impossible to get them into the frame.
That’s where the spring-pulling tool and the rubber mallet could come in handy – the former will help you pull the spring to its dedicated hole, and the latter will help you jolt it into place.
Your first instinct will be to work your way around the frame clockwise or counterclockwise, starting from the point you’ve picked initially.
That’s only going to make things ten times harder than they have to be, though.
Instead, pretend that the first connected spring is the twelve o’clock one, and attach the following three in this order:
The second spring should be opposite to the first one, at the six o’clock position, and the third one should be placed at three o’clock position. The fourth one should go right across from it, on the nine o’clock position.
You get the picture.
Once you’ve connected the initial four springs, you can continue going around the frame in that same manner until you’ve filled all the gaps.
It’s starting to look like a proper trampoline now, isn’t it?
Step #4: Add Protective Pad (And Preferably An Enclosure Net)
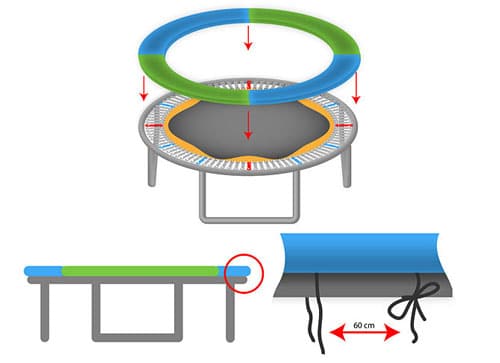
The protective padding is every bit as important as the rest of the trampoline – even more so when you factor in safety that they offer by preventing you from landing directly on the springs.
The protective pad is designed to slide over the springs, and has gaps that line up with the rest of the frame, too:
Place the pad over the springs, and secure it to the trampoline with either rope, Velcro, or included hooks.
That’s all there is to it.
BONUS TIP
Larger trampolines will typically come with an enclosure net. If the one you’re assembling doesn’t have it, I strongly suggest that you consider purchasing one for added protection.
The enclosure poles come together, much like the rest of the frame does. They snap into their dedicated holes and are secured with screws. All that’s left then is to slide the net onto the poles, and tie it to the frame using strings or included bungee cord.
Step #5: Perform Safety Checks
Safety checks are arguably the most critical part of assembling a trampoline.
Do I even need to point out why?
There are two recommended ways to go about it:
You can either do safety checks throughout the assembly process or wait until you’re done to take care of it.
I prefer doing both to tell you the truth:
I’ll do minor safety checks along the way, like the tightness of the screws and the alignment of different parts. Then, I’ll go over everything once more when I’m done, to make sure that the overall construction of the trampoline feels stable and secure.
This list could help you perform your trampoline safety checks, and make sure that you didn’t overlook anything:
BONUS TIPS
I don’t know what the weather is like where you live, but I always recommend anchoring your trampoline for good measure. Trust me; you don’t want to see it flying around your backyard.
You can use one of those generic anchor kits that can be found in local hardware stores, U-shaped wind stakes, or even something as simple as sandbags. Either way, anchoring it is a smart move.
Final Word
Before I wrap this guide on how to set up a trampoline up, I’d like to give you one last piece of advice:
It’s perfectly understandable if you’re nervous about assembling a trampoline for the first time – but as I’ve hopefully shown you today, it doesn’t have to be „mission impossible.“ Follow the instructions, double-check everything, and focus on safety above everything else.
And remember to have fun once it’s done!
My name is Larry Dunn from Dallas Texas and I have a deep passion and love for the trampoline.
With many years of experience in the field of healthcare service, I have decided to start his own website which is about a trampoline.
With this website, I will share his experiences and expertise advices on different factors to consider when deciding whether or not a trampoline is safe for you and your family.

